Chapter 14
| Jurisdiction | United States |
"The reason that Apple is able to create products like the iPad is because we've always tried to be at the intersection of technology and the liberal arts."
Steve Jobs, co-founder Apple Computer
A. iPad for Litigation
An iPad tablet is an ideal tool for a trial lawyer. With nothing more than a tablet in your hands, you can move about the courtroom or pretrial venue and pull up any item in your case file and show it on a monitor or project it onto a screen. Once the image is on the screen, you can annotate it with a callout or highlighting. You can show your PowerPoints for opening statement and closing argument with your tablet. When you wish to have the screen go blank, allowing you to directly communicate with your audience, you can do that with your tablet.
With an iPad, you are in control. You do not need to employ a communications expert. Indeed, because you are not relying on another person to operate the equipment, you do not need to give that other person directions, which inevitably interrupts the flow of the trial. Beyond these considerations, you save money. Your jurors expect you to use technology. They are comfortable with it, and your use of it will help you make a connection with them.
Alternatives to the iPad exist; Microsoft's Surface Pro is one. Using the touch screen feature on a detached Surface Pro along with either a Microsoft Wireless Adapter and/or a nonlinear PowerPoint slides template found on this book's companion supplement website http://www.fastcase.com/visuallitigation. Appendix 14.1, the user can be a very effective with this Microsoft product.
B. TrialPad
TrialPad by LIT SOFTWARE, LLC came on the market in 2010, the same year that the iPad was introduced. TrialPad has been updated several times since then, and it is now an outstanding tool for storing, retrieving, and presenting visuals in a courtroom and elsewhere. TrialPad is an application with most of the functionality of Sanction and TrialDirector. Other advantages of TrialPad include cost and accessibility. TrialPad is relatively inexpensive, compared to some alternatives. TrialPad also can be learned in short order. Ease of use in the courtroom or a pre-trial venue is a major benefit.
1. Functions
TrialPad's functions include most of those we described for nonlinear software, such as Sanction, and some of them are that TrialPad can:
• Organize and store the case—Store documents, images, and so on from your computer into a case file in TrialPad.
• Retrieve and display exhibits—On the left side of the screen, your evidentiary items are listed, and when you touch to select the desired one, and press the present button, the image is projected onto a screen in the courtroom or a pretrial venue.
• Callout a portion of the image—Select a portion of the image and use the callout tool to blow up that portion to give the audience a better view.
• Annotate the image—TrialPad has multiple tools that allow you to annotate the image by highlighting, redacting, or writing on it with the pen tool.
• Work with exhibits—TrialPad tools allow you to create exhibit labels and notations regarding the admission of the exhibit into evidence.
2. Hands-on
The axiom that there is no substitute for experience when comes to learning how to do something, like learning how to operate TrialDirector or Sanction, applies equally well to TrialPad. TrialPad's user manual is available online.1 Also, you can watch a tutorial for TrialPad on YouTube.2
3. Mastering TrialPad
The beauty of TrialPad is that it is easy to learn how to operate. When you open TrialPad, it takes you to a landing page, which is the Cases screen where on the left you can find your cases in folders.
Your first step will be to create a Case Folder by selecting the New Case tab (with + on it) on the left side of the screen at the top. A dialog box will appear, and you can name the file. When you select the View button, your Case Folder will be shown.
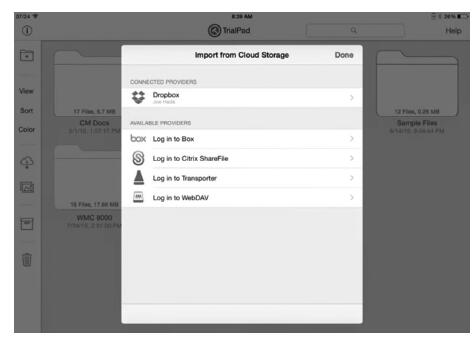
Next, you will want to import your case file into TrialPad. This can be accomplished in multiple ways. You can import the file by selecting the Cloud Storage button on the left column; this will bring up the options for importing from the cloud.
Another way to import your case file is to use the iTunes share function. Connect your computer to the iPad with a USB cable and open iTunes. Then, select the iPad tab at the top of the screen, followed by Apps (with + sign) in the left column. Scroll down the right side of the screen...
To continue reading
Request your trial